Excellent Facebook ad targeting is the key to a successful ad campaign.
You could have the best offer in the world and the coolest product, but if you’re targeting the wrong people, no one will buy. Simple as that.
In this chapter, we’ll discuss three main types of targeting:
- Facebook custom audiences and lookalike audiences
- Interest-based targeting
- Facebook Remarketing Ads (AKA Retargeting ads)
But before we get into those, let’s discuss what a custom audience is and how to use it.


What is a Facebook Custom Audience?
A Facebook custom audience is a specific group of people you can show your ads to, such as a list of your past customers This is done by uploading a hashed customer list.
You can laser-focus your Facebook ad targeting to the audience you’ve created on Facebook, Instagram, and Audience Network.
→ Click Here to Launch Your Online Business with Shopify
How to Use Facebook Custom Audiences
According to Facebook, here is the exact process to create a custom audience:
- Go to your Audiences
- If you already have audiences, click the Create Audience dropdown and select Custom Audience.
If you don’t currently have an audience, Facebook will show you audience creation buttons, instead of dropdowns. Choose Create a Custom Audience. - Click Customer File
- Click Add from your own file
From there, there are five parts to creating your Custom Audience:
- Add Customer File
- Edit Data Mapping
- Hashed Upload & Creation
Below, we’ll break down each one.
1. Add Customer File
To add a customer file:
- Choose whether you’ll upload your customer file as a file (.txt or .csv) or copy and paste it.
- If you choose to upload, click Upload File and select your customer file. If you choose to copy and paste, do so in the ‘Paste your content here’ field.
- Give your audience a name and description if you want to.
- Click Next.
Tip: You can download a data file template Facebook created that’s set up to help their system map your data more easily. Click Download file template to check it out.
2. Edit Data Mapping
Facebook will show you a preview of your data and how they’ve classified it. There are three statuses you may see in this preview:


Note: If a lot of errors appear, it might be that Facebook is seeing a different delimiter (a wrong one). Delimiter is the puntuation mark that plays the role of seperating data points. You can modify it by hovering your mouse over “modify the delimeter” and selecting a new one.
Facebook allows you to interact with your data preview in three different ways:
- Changing the data type
- Removing the data from match consideration
- Changing the data format
To change your data’s type, click the dropdown and choose what type of data you’ve provided. From this dropdown, you can also choose Do Not Upload, which tells Facebook not to use that data when matching.
To change your data’s format, click the Choose format dropdown and choose what format Facebook should be using to match your data.
Note: Every data piece needs a type to be usable, but formatting details are required only by some kinds. If it’s needed, you’ll see a “Choose format” dropdowno.
If you need to change anything about your customer file to maximize the number of identifiers Facebook can use, do so now. Once you’re ready, implement the above-mentioned steps once again. When you’re satisfied, click Create & Upload.
3. Hashed Upload and Creation
Facebook will hash your data, upload it and create your audience for you. This may take a little while if your file is large. Feel free to continue working in another browser tab or window while you wait.
Next Steps
When we’re done creating your Custom Audience, we automatically generate a list of next steps you can take to get the most out of it. You can take one of those next steps immediately or click Done to finish.
And that’s all there is to it! You now have Facebook custom audiences ready to see your ad campaign.
Next up, let’s dive into the three types of Facebook audiences:
1. Facebook Lookalike Audiences
Facebook lookalike audiences are simply Facebook custom audiences who are similar in demographics and interests to a current audience you’ve saved.
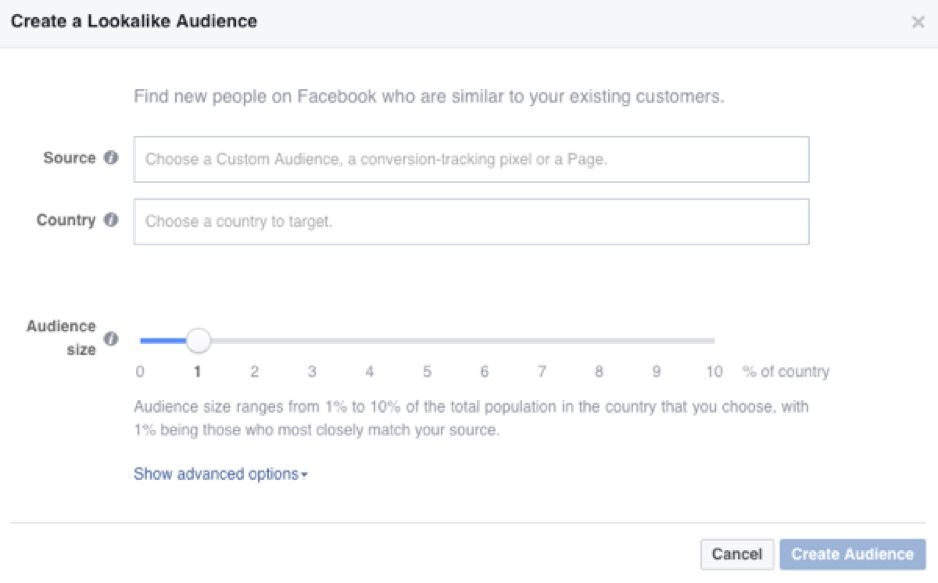
For example, you can create a lookalike audience of people who are similar to your current customers. (More examples in the next section.)
Lookalike audiences are one of the best ways to scale up your advertising, since you’re essentially getting more of your highest converting customers!
Pro tip: Your audience size moves on a scale of 1% to 10%, with 1% being the most similar demographics and interests to your current audience. So start your campaigns at 1% until you achieve a higher reach, then slowly increase it one percent at a time until your CPA goes above your budget.
Types of Facebook Lookalike Audiences
Other than lookalikes of current customers, you can also create other lookalike audiences, such as:
- Website visitors
- People who visited a specific page on your site
- People who performed a specific action on your site (like viewing a video)
- Lookalikes of your email subscriber list
- People who engaged with your Facebook posts or viewed a Facebook video
- Lookalikes of your Facebook page likes
Depending on which audience you’re creating a lookalike of, the steps vary slightly. However, they all follow the same beginning path.
How to Create a Lookalike Audience
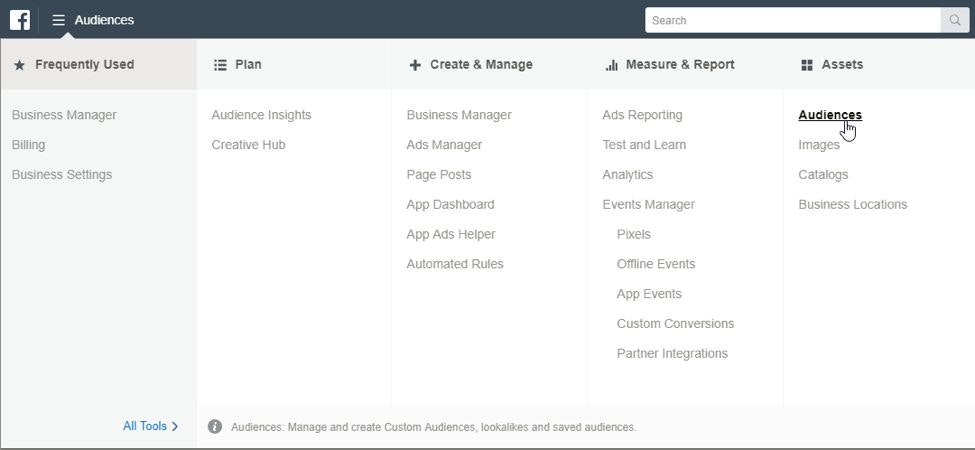
To create a lookalike audience, go to your Ads Manager, expand the ‘All Tools’ section, then click ‘Audiences’.
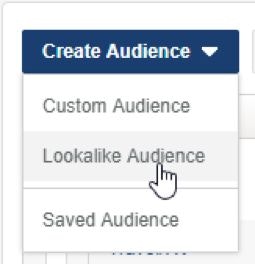
From here, click ‘Create Audience’ -> ‘Lookalike Audience’.
Here’s where the steps vary based on what you’re trying to do. You need to choose a source to draw your lookalike audience from.

This is typically a custom audience you created (such as your email list), but you can also choose to create it based off any of your pixel’s data, your Facebook page audience, or your Facebook page’s engagement.
Then, choose the country you want your audience to be located in. Finally, select your audience size. I recommend starting with 1%.
Pro tip: Under ‘advanced options’, you can create multiple audiences based on the audience size percentage. For example, you can target a 1%, 3% and 5% audience to see if a larger audience hurts your conversions or CPA.
And that’s all there is to it! You’re now ready to target your lookalike audience with your Facebook advertising. Next up, we’ll talk about interest-based targeting.
2. Interest-Based Ad Targeting
Interest-based targeting is probably the least reliable targeting method on Facebook.
This is because, unless you do a lot of solid market research, your ads could be a complete flop. It’s like throwing darts in the dark.
Interest-based targeting is also the most complicated and difficult targeting method. It’s the only targeting method where you decide on the audience, rather than uploading people who are already engaging with or buying from you, or letting Facebook use their algorithms to create the audience for you.
That said, if you don’t have a lot of website visitors, customers, or Facebook page engagement, interest-based targeting is pretty much your only option. It’s the only method that doesn’t require you to have any prior data.
How to Create An Interest-Based Audience
To create an interest-based audience, go to your ads manager and create a new saved audience in the ads manager.
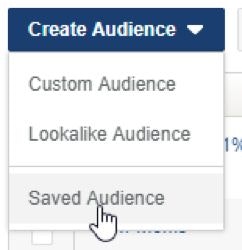
In the pop-up window, name your audience (remember to give it a good descriptive name so you’ll remember what it is, such as ‘Soccer Moms 25-45’ or something). Choose your country, age range, and gender.
Then, scroll all the way down till you see the detailed targeting box.
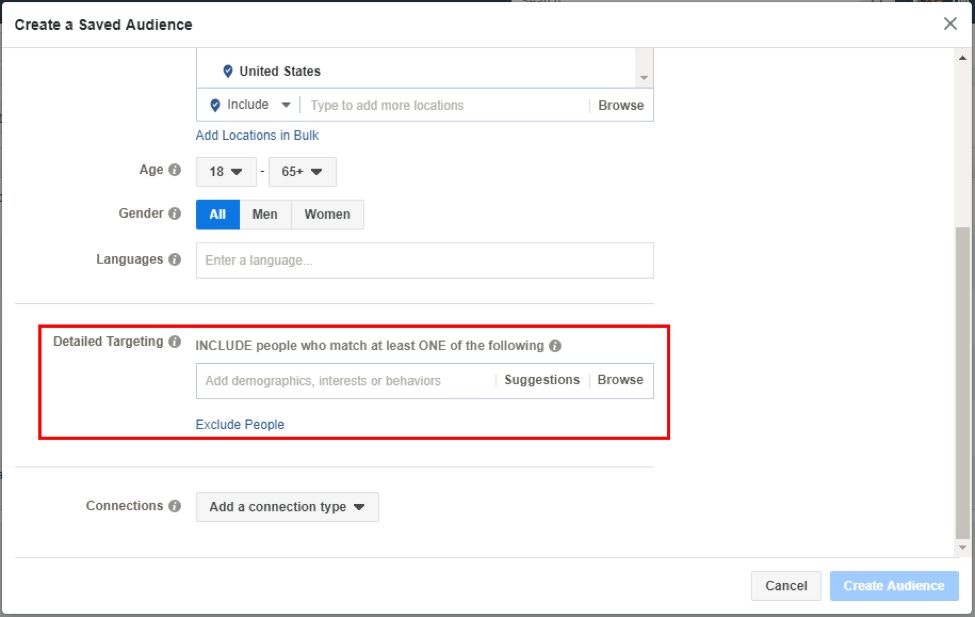
Here you can type in a specific interest, demographic, or behavior.
Alternatively, you can browse through all the targeting options by selecting ‘browse’.
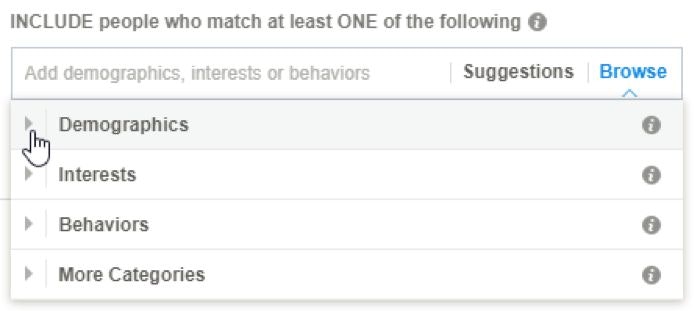
Note: I highly recommend being as specific as possible with your interest targeting. This is because broad-match interests, like ‘online marketing’, include loads of specific interests, like ‘Facebook advertising’ or ‘content marketing’. If you’re targeting your ad to Facebook advertisers, you don’t want to target all online advertisers, or your conversions will suffer.
Keywords you type in here are a blend of fan pages, buzzwords, and more.
These can be totally hit or miss. They can generally be placed in two categories: Fan Pages and Other. In general, fan page targeting performs better than using other keywords unless you layer your targeting.
For example, if I have a shirt that says “All I need is my cat and a Harry Potter book”, targeting people who like cats and Harry Potter could yield greater results than simply targeting a Harry Potter or cat fan page.

Note: If a keyword isn’t linked to a fan page, it’s usually a ‘like by association’ keyword. Meaning a keyword Facebook uses to describe you that you haven’t actually ‘liked’ yourself, but rather one Facebook’s algorithm has given you, based on your behavior. Such as commenting on a post, talking about something in messenger, or in other subtle ways you’ve interacted with the topic.
Now that you know how to create an interest-based targeting, let’s talk about how to get the most out of them.
Interest-Based Targeting Tips
Here are a few ways to kill it with interest-based Facebook ads:
1. Hyper-target highly engaged fan pages.
Targeting any old fan page around your topic simply won’t do it. You need to find highly engaged fan pages. That way you know it’s not just a bunch of random people invited to like a page, but rather people who are genuinely interested in and care about a topic.
To find solid fan pages, start with Facebook’s search bar. Type in your target keyword (like ‘Harry Potter’) and start browsing the pages that come up.
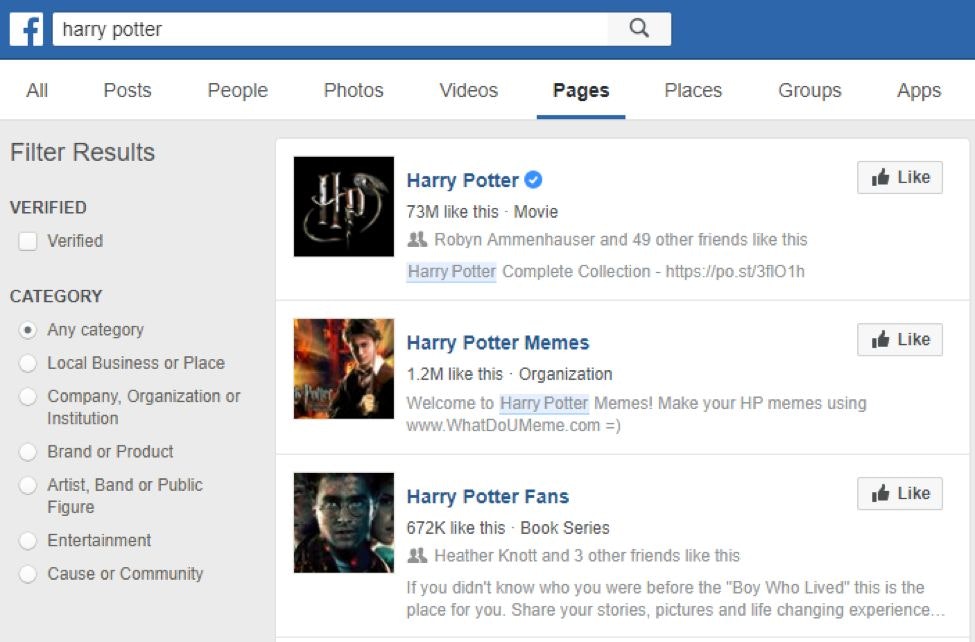
Some things to keep in mind:
- Don’t just go for the ones with the most likes. Likes =/= engagement.
- Click through on them to see if people are engaging.
- Consider filtering your search to ‘Cause or Community’ as these are typically the most engaged.
- Look for pages that don’t use title case (like ‘harry potter’ instead of ‘Harry Potter’). For whatever reason, these tend to get more engagement.
But sometimes Facebook won’t allow you to target certain fan pages. What do you do then?
2. Use creative problem-solving to find ‘hidden’ Facebook fan pages.
You may try to target a page but can’t seem to find it (to target with ads) even if you type it’s exact name in the search bar.
Attila from Iamattila.com came up with a genius way to target those pages without actually targeting those exact pages. Here’s how:
Step 1. Go to the page or group and check out the about section for keywords (and tags) that are used to the describe it.
Step 2. Set up a campaign where you target keyword #1 AND keyword #2 AND keyword #3 or however many you see fit from your research – obviously, the more you pick the more specific you can target.
This won’t target that page exactly, but chances are high that Facebook’s algorithm will show your ad to that same audience who liked that page.
If the page you found doesn’t have tags (like the harry potter page in the example above), there’s another method you can try.
You can find some ‘unavailable’ fan pages by searching keywords around their topic, such as the company category mentioned on their fan page. This is because fan pages are all (theoretically) targetable, but some are incorrectly tagged.
For example, a company page won’t be targetable if they change the name of their company (and the name of their Facebook page) but don’t change the tags to reflect that update. If you search their old company name, their page will come up – but it won’t if you search their new company name.
Moving right along!
3. Go deeper with your targeting.
OK, so there are loads of people who ‘like’ Harry Potter. It’s so popular that even people who have never read the books or seen the movie ‘like’ the page, just because.
Same things with tons of other topics. Not everyone who ‘likes’ Tiger Woods page actually likes golf. Not everyone who ‘likes’ Robert Downey Jr’s page likes Iron Man.
But, someone who likes ‘First State Potion Masters – Harry Potter Alliance Delaware Chapter’? Now they are true Harry Potter fans, not just people jumping on the bandwagon.

Another example: Someone who likes ‘Dustin Johnson’ is much more likely to be a golf fan than someone who likes ‘Tiger Woods’, because Dustin’s name isn’t as well known among non-golfers. Just like someone who likes ‘Iron man suits’ is more likely to be a true Iron Man fan than someone who likes the Iron Man official movie page.
You get my point – people who like specific parts of something are more likely to be true fans than just surface-level ‘likers’.
4. Use layering to get hyper-specific.
Remember above how I said you need to target multiple keywords for a broad keyword to be effective? That’s called layering, and it’s the only way to create successful broad targeting keywords.
I gave the example of a cat/Harry Potter shirt targeting people who like ‘cats’ and ‘Harry Potter’.
To do that, you need to ‘Narrow’ your audience.
This means you target people who like the first interest AND the second interest, rather than the first interest OR the second interest.
You can also narrow it further to keep adding keywords.
But did you notice the ‘Exclude People’ button?
5. Don’t be afraid to exclude people.
By excluding people you can get even more hyper-focused with your Facebook advertising.
For example, you might target people who like the ‘Field and Stream’ magazine, but then exclude hunters so you only target the fisherman. (Of course, there are better ways of using targeting fisherman, but you get my point.)
The takeaway is this:
You want to get as hyper-focused to the right audience as you possibly can. Facebook gives you the tools to do that by selecting highly-engaged fan pages, layering keyword interests, and excluding the wrong people from seeing your ad.
You need to understand your buyer persona and do your market research to learn the exact interests, behaviors, and even slang your target customer uses if you want to be successful with interest-based Facebook ads.
3. Facebook Retargeting Ads (AKA Remarketing Ads)
Get this: Website visitors shown Facebook retargeting ads are 70% more likely to convert!
Facebook retargeting ads (also called Facebook remarketing ads) are one of the best and easiest ways to increase your traffic and sales without much effort. They show your products to people who have already seen them on your site.
While you can retarget website visitors and people who viewed a particular product, I’ve found the highest-converting ads to be retargeting abandoned carts.
How to Set Up Facebook Retargeting Ads
Creating a retargeting ad is easy. All you need is to have data on your pixel.
Specifically, you need two custom conversions:
- Whenever someone adds an item to cart.
- Whenever someone purchases an item.
Once you have that data, the first step is to create a new Facebook custom audience based on website visitors. Include people who initiated checkout, but exclude people who purchased (or saw your order complete page).

Once that’s done, simply create a Facebook ad campaign targeting your new custom audience. That’s all there is to it!
You can also retarget website visitors simply by creating a custom audience of previous website visitors, or retarget people who viewed a particular product (but didn’t add it to their cart) by using the ‘People who visited specific web pages’ option.
Beyond products, you it’s a good idea to retarget your blog content to people who have viewed it previously. This is particularly useful if it’s a very long article, and you could target people who only spent a minute on page (not long enough to get through the full thing and subscribe).
One strategy that works particularly well was shared with us from Ross Simmonds, a marketing consultant who helps eCommerce stores grow:

Ross Simmonds, marketing consultant
“One of the most underrated yet powerful ways for an eCommerce brand to drive results with their customers is third party validation. Whether it’s validation from a friend or validation from a blogger, people love getting recommendations from other people. For this reason, I often advise eCommerce brands to put media behind articles that reference them as must-try products or solutions.
Let’s say you’re selling products that are targeting young parents. Rather than promoting your products to this demographic with an ad telling them to buy now – warm up your target audience by promoting an article titled: “8 Things Every Young Parent Needs To Stay Sane In 2018” but includes a reference to your product. Once they’ve clicked on that article, you could retarget them with your product and increase your likelihood of conversion.”


Facebook Ad Targeting Conclusion
You’ve made it through this chapter and learnt all about Facebook ad targeting!
If you take nothing else away from this chapter, remember this:
Your ads are only as successful as the audience you show them to.
It doesn’t matter how great of an offer you have or how much you spent designing the perfect ad and hiring the best copywriter. If you’re showing the ad to the wrong people, it just won’t convert.
Your audience is always the first thing you should test when an ad isn’t performing. If you have the audience right, the next thing to check isn’t the ad itself, but rather the offer.
In the next chapter, you’ll learn how to optimize the ad itself. Let’s dive in!

